Making a dialogue manager for Godot
If you're making your game with Godot like me and you need some dialogue like me then you should check out Godot Dialogue Manager.
As part of the first Godot Addons Jam I decided to take all the bits and pieces that I'd learned from making my standalone dialogue editor and dialogue runtime and make a new all-in-one dialogue manager addon.
The first step was to make the basic plugin file structure and get something showing up in the editor.
Thanks to Emilio's video about making your first editor plugin I knew how to do that.
In the main plugin file you can just instance a copy of your main screen and add it to the editor interface like this.
func _enter_tree() -> void:
    if Engine.editor_hint:
        main_view = MainView.instance()
        get_editor_interface().get_editor_viewport().add_child(main_view)
        main_view.plugin = self
        make_visible(false)

func _exit_tree() -> void:
    if is_instance_valid(main_view):
        main_view.queue_free()

func has_main_screen() -> bool:
    return true
Then you can specify a title and an icon for your editor tab.
func get_plugin_name() -> String:
    return "Dialogue"

func get_plugin_icon() -> Texture:
    var scale = get_editor_interface().get_editor_scale()
    var base_color = get_editor_interface().get_editor_settings().get_setting("interface/theme/base_color")
    var theme = "light" if base_color.v > 0.5 else "dark"
    return load("res://addons/dialogue_manager/assets/icons/icon_%s_%d.svg" % [theme, scale]) as Texture
All that stuff about scale and theme there is to make sure the icon renders at the right size compared to the other editor icons.
When I originally opened the plugin up on my Mac to test it I was greeted with a tiny icon.
You can overcome this by having different icons for different editor scales.
I do this by just having identical clones of the same SVG file and just setting the import scale to what I want.
And you'll need another copy of each so you can swap between dark and light themes.
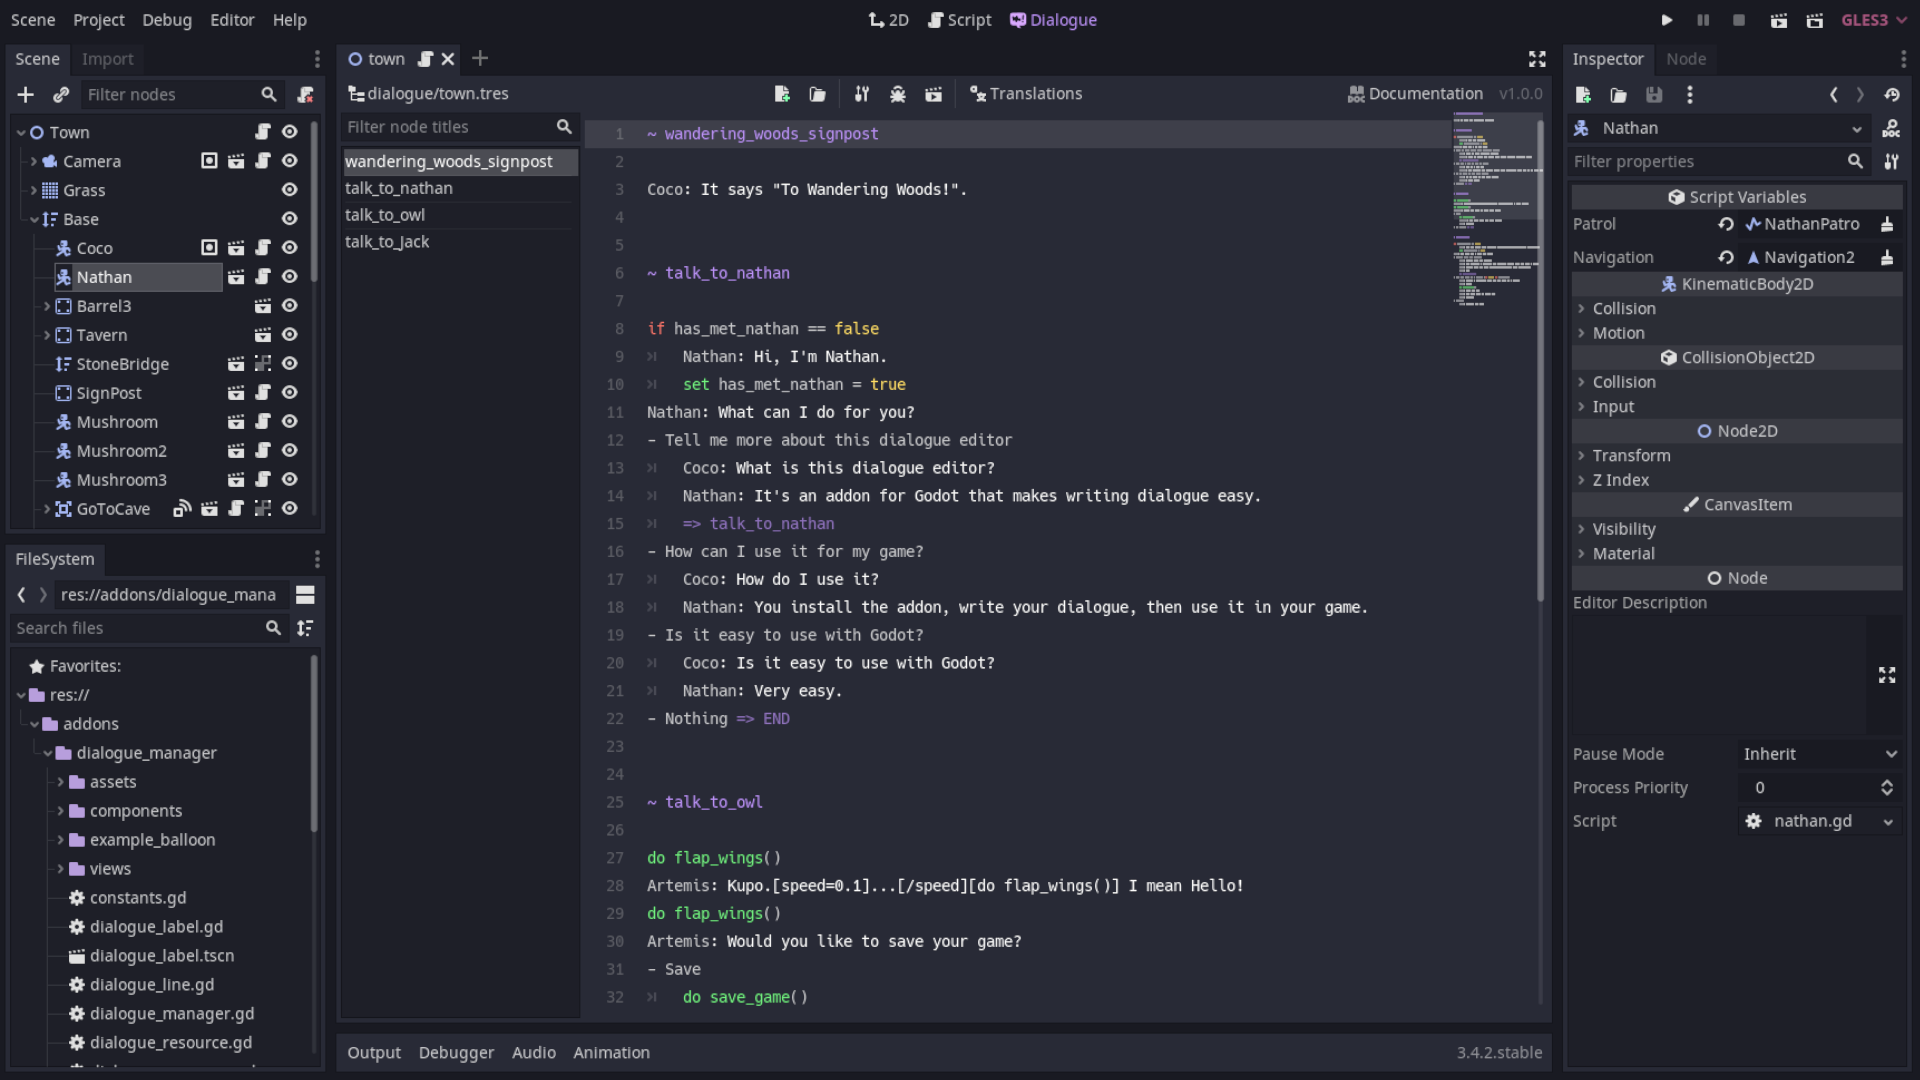
Building out the interface was pretty much the same process as building it the first time around - It's all just VBoxes and HBoxes.
One thing that was different, though, is that I had to add the tool keyword to any script that's used in the plugin.
I did read it in the docs and then totally forgot about it.
Then, after getting some very confusing behaviour and errors on things that shouldn't have errors I worked out that that's what I was missing.
And then I proceeded to fall for that trap a further 8 times.
Once I had the general UI I moved onto the parser.
The parser I wrote for the standalone editor would have probably been fine to copy over but I wanted to take the opportunity to tidy it up a bit.
It may not be best way to write a parser but it works and its mostly easy to follow.
It iterates over each line and works out what type it is.
Then, depending on that type it looks up whatever it needs to look up in order to satisfy any properties that type has.
Then it does some basic error checking of whatever properties it has worked out.

If there are any errors then the UI shows them in a list.
I couldn't find a proper way to highlight error lines so I'm repurposing the bookmarking feature of TextEdits and colouring them red to show error lines.
The results of each parse get stored in the resource file automatically.
If you try to run some dialogue with a resource containing errors you'll get a runtime error telling you as much and which file it is.
Next up I wanted to set up the icons for my toolbar.
I wasn't about to make my scaled and themed icon problem a million times worse by making my own toolbar icons so I opted to use the icons provided by Godot itself.
To work out what icons I could use I found another addon called the Godot Editor Theme Explorer that lets you inspect the current editor theme and pull out colours, fonts, styles, and most importantly, icons.
Using built-in icons also means you don't have to deal with scale and theme colouring and the plugin blends in better with the rest of the editor.
And, speaking of blending into the editor, another thing I wanted to add is for when you double click a dialogue resource in the file system panel it would open up in the dialogue editor.
It turned out being as simple as implementing two functions: handles and
edit.
func handles(object) -> bool:
  return object is DialogueResource

func edit(object) -> void:
  main_view.current_resource = object
handles is given the current object being opened and you return true if your plugin can handle that file.
Here I just check to see if it's a dialogue resource.
Then in edit you get the same object so your plugin can do something with it.
I just set it to be the current resource being edited which opens it up in the main dialogue edit window.
One of the things the dialogue manager needs at run time is a list of global game states.
It uses these whenever you reference a variable or method.
You can do it programmatically but I've also added an interface in settings to make it a bit easier.
It lists out the autoloads you have on your project and you can enable which ones contain game state and methods that you want your dialogue to have access to.
I couldn't find a proper way to get the list of autoloads so this is just loading the project.godot config file and reading
from that.
Once the editor was done I moved onto the runtime.
Most of the code there was similar to my old runtime but with a few quality of life modifications that came with the new parser and integrated editor.
I added an example dialogue balloon that can be used as a starting point for testing out dialogue.
You can look at the code to see how it works as a basis for your own balloon.
One other quick thing I'll mention is that the plugin will try and check for updates to itself when you first open it.
It does an HTTP request to the plugin GitHub page and checks the version available there.
If there is a new version you'll see a button pop up in the top right that, when you click it, it will open a browser to GitHub so you can download the new version.
That's probably all I have to say about the plugin for now.
I'm already using it for all of my dialogue so I'll probably be adding features as I need them.